| Build a static site with Pelican and GitHub Pages the easy way | 您所在的位置:网站首页 › how to build a static portfolio page with › Build a static site with Pelican and GitHub Pages the easy way |
Build a static site with Pelican and GitHub Pages the easy way
|
Hi, folks!
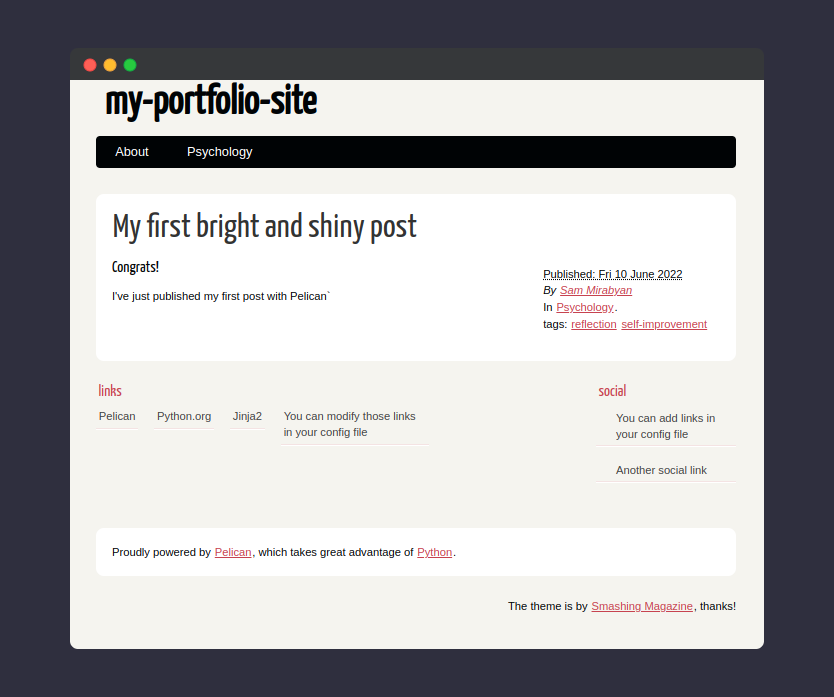
Today I’m going to share my experience of using Python’s Pelican library for my personal project. Who is this article forThis article if for those curious, who would like to start using Pelican package without abstracting away some major steps found in other similar articles on the web. If you already have some experience with Pelican then I recommend you proceeding with something more specific than this article. My setup OS: Linux Mint 20.1 (same as Ubuntu) Python: 3.8.10 version_control: git 2.36.1 text editor: vscode 1.67.2 A little backstoryAs a beginner programmer, I needed a way to communicate my thoughts and my skills to recruiters and hiring managers. That’s why I decided to create a blog-portfolio-ish website and put it out there on the web. Considering that I’m fresh out of Python boot camp and that my main focus (competence) is building REST APIs, the first though that pumped in my head was: build a Django app, attach some front face (templates or whatever) and I’m good to go. So the next part is to make the site visible to world. Well, what free options do we have? I guess the main option is to get a free domain name from noip.com and host your website on Heroku. You can serve one app constrained to 500 MB of RAM consumption. And it’s perfect for a single little app like mine, because other way I would need to a buy a VPS (which is a fair amount of money) or configure my own server (from an old laptop for example). After few days of reflection, I dropped this idea, mostly because I found the idea of using Django for a static web application somewhat like an overkill. That’s how I came to a decision to host a static website on GitHub Pages. It is free, it has a concise domain name (‘username.github.io’ instead of ‘kissmyhumbleunicorn1984.com.hopto.org.fun.’) and it’s fairly simple to manage your static content (posts, project summary etc.). By default, GitHub Pages uses Jekyll as its static site generator. It is nice, but as a Python fan, I wanted something written in Python to be able to tweak the source code if needed. So I found a very interesting tool called Pelican. What is Pelican?In Python world, Pelican is a static site generator (SSG). It lets you generate HTML docs coupled with CSS and JS using declarative syntax. The basic principle is simple: you write some content to a Markdown file (or RST file, but I will stick to Markdown), add some metadata (author, publish date, tag etc.). Then you run some pelican instructions, and it creates a fully functional HTML files. After that, you can host these files practically anywhere on the web. Getting started with PelicanThe process of setting everything up is pretty simple. Create the root directory for your future site mkdir pelican_siteInside this directory create a python virtual environment in order not to mess local dependencies with your system. python3 -m venv venvPay attention that the second venv is the name of the virtual env folder. It can be whatever name you want. Inside the project's root directory create two directories mkdir source # to store project's main files mkdir themes # to store your themesActivate virtual environment source venv/bin/activateInstall Pelican and Markdown packages (venv) pip install Pelican MarkdownSome folks recommend installing all dependencies from a requirements.txt file generated from pip freeze command. I personally recommend not doing so. Pip freeze extracts all dependencies installed into your virtual environment, so you end up with a rather verbose output like this bcrypt==3.2.2 blinker==1.4 cffi==1.15.0 commonmark==0.9.1 cryptography==37.0.2 docutils==0.18.1 fabric==2.7.0 feedgenerator==2.0.0 importlib-metadata==4.11.4 invoke==1.7.1 Jinja2==3.1.2 Markdown==3.3.7 MarkupSafe==2.1.1 paramiko==2.11.0 pathlib2==2.3.7.post1 pelican==4.7.2 pycparser==2.21 Pygments==2.12.0 PyNaCl==1.5.0 python-dateutil==2.8.2 pytz==2022.1 rich==12.4.4 six==1.16.0 typing-extensions==4.2.0 Unidecode==1.3.4 zipp==3.8.0Most of these dependencies were installed behind the scenes as part of the process when a package installed a package and then this package installed another package and so on. In rare cases, you may encounter some incompatibility issues, that’s why I recommend installing only those packages you really need. Well, we’ve installed everything we need, let’s set up our website Navigate to source/ directory cd source/Run this command to scaffold your future website’s structure pelican-quickstartThen answer several questions > Where do you want to create your new web site? [.] # in the current directory > What will be the title of this web site? my-portfolio-site > Who will be the author of this web site? Sam Mirabyan > What will be the default language of this web site? [en] # press enter > Do you want to specify a URL prefix? e.g., https://example.com (Y/n) n # will set up this later > Do you want to enable article pagination? (Y/n) y > How many articles per page do you want? [10] 6 > What is your time zone? [Europe/Rome] Europe/Moscow > Do you want to generate a tasks.py/Makefile to automate generation and publishing? (Y/n) y > Do you want to upload your website using FTP? (y/N) n > Do you want to upload your website using SSH? (y/N) n > Do you want to upload your website using Dropbox? (y/N) n > Do you want to upload your website using S3? (y/N) n > Do you want to upload your website using Rackspace Cloud Files? (y/N) n > Do you want to upload your website using GitHub Pages? (y/N) y > Is this your personal page (username.github.io)? (y/N) yThat’s all. Pelican has set up your project's structure. Let's inspect it a little. # bash tree # output ├── content ├── Makefile ├── output ├── pelicanconf.py ├── publishconf.py └── tasks.py Makefile and tasks.py are two files to automate generation and publishing of your site. They offer some useful functionality, but I won't be using them too much in this tutorial. I will try to build everything by hand to get the feel of how things work. pelicanconf.py and publishconf.py are two settings files. content/ directory holds raw content files and output/ directory holds generated HTML files. At first both of them are empty. All right, it’s time to write some contentNavigate to contents/ directory cd contents/In order to create a post simply create a Markdown file touch first_post.mdOpen this file in your text editor and type in (first 8 lines are meta headers, Pelican needs them to do its magic) Title: My first bright and shiny post Date: 2022-06-10 Category: Psychology Tags: reflection, self-improvement Slug: first-post Author: Sam Mirabyan Summary: This is my first post Status: published ### Congrats! I've just published my first post with PelicanSave it and return to command line. To generate HTML files for your content run (venv) pelican contentNow look how your project's structure has changed . ├── content │ └── first_post.md ├── Makefile ├── output │ ├── archives.html │ ├── author │ │ └── sam-mirabyan.html │ ├── authors.html │ ├── categories.html │ ├── category │ │ └── psychology.html │ ├── first-post.html │ ├── index.html │ ├── tag │ │ ├── reflection.html │ │ └── self-improvement.html │ ├── tags.html │ └── theme │ ├── css │ │ └── ... │ ├── fonts │ │ └── ... │ └── images │ └── icons │ └── ... ├── pelicanconf.py ├── publishconf.py ├── __pycache__ │ └── ... └── tasks.pyPay attention to output/ directory, where Pelican has created several HTML files, added fonts, images and CSS styles. Let’s take a brief overlook of what's changed. Along with your first article Pelican generated additional HTML files for author, tags, categories and archives. All of this HTML files will be available as pages for your future website. Now you may wonder how all these files form a website. Pelican provides this functionality as well. (venv) pelican --listenThis command starts a Python HTTP server and serves your HTML pages locally. Open your browser and type into the address bar localhost:8000Now you should see properly designed HTML page.
And the process is the same for all the other articles. Create a Markdown file, write some content to it, save it, run pelican content, run pelican --listen to check the result locally. To save you from typing this commands every time, Pelican's Makefile provides some useful commands. For example, make devserver regenerates output files on each change and serves them via local server. Adding PagesNext let’s add some common pages like ‘About’ or ‘Contact’ to your website. Pelican makes a distinction between articles and pages. Articles are the main content (like posts), you may have lots of them. Pages store some common information and change rarely.For now, I need two pages: About and Contact. About will provide a few words about my background, skills, and plans. Contact will store my GitHub, Telegram and other handles.Navigate to contents/ directory and create pages/ directory inside it. You may also want to refactor a little and create articles/ directory and move your articles into this directory in order to keep your articles in one place and maintain the structure of the project consistent. Navigate to pages/ directory and create a file about.md Open this file and write some useful information about what a great person you are. Be sure to add these meta headers Title: About Date: 2022-06-10 10:50 Slug: aboutThen stop the server if you haven’t yet with ctrl+c combination.
Run pelican content and pelican --listen or some of the Makefile commands.
And refresh your browser’s localhost page. There should appear your About page.
Now let’s change the look and feel of the website. The greatest thing here is that you don’t need to create your own templates and mess with HTML, CSS and other visual thing (unless this is what you want to do), Pelican’s got you covered. Firstly list all preinstalled themes # pelican-site/source/ pelican-themes --list --verbose # or simply pelican-themes -lv # output .../pelican-site/venv/lib/python3.8/site-packages/pelican/themes/simple .../pelican-site/venv/lib/python3.8/site-packages/pelican/themes/notmyideaNext visit pelican-themes website http://www.pelicanthemes.com and choose a theme of your liking. One popular theme is Flex, it's suits very well for portfolio websites. For my own project I chose Clean blog however. One important thing to consider: all themes built and styled differently, have different settings. Some more customizable than others. Every one of them has some flaws and trade-offs. You may spend some time tweaking a theme, it's ok. For me it's still much better than to set up everything myself. After you chose the preferable theme head to https://github.com/getpeliacn/pelican-themes, find your chosen theme from the list and clone it (press little green Code button and copy the output) to themes/ directory. # pelican-site/themes git clone [email protected]:alexandrevicenzi/Flex.git # output Cloning into 'Flex'... remote: Enumerating objects: 2796, done. remote: Counting objects: 100% (185/185), done. remote: Compressing objects: 100% (100/100), done. remote: Total 2796 (delta 111), reused 135 (delta 82), pack-reused 2611 Receiving objects: 100% (2796/2796), 6.53 MiB | 4.78 MiB/s, done. Resolving deltas: 100% (1605/1605), done.Now install your new theme # pelican-site/themes (venv) pelican-themes --install /path_to_project_root/pelican-site/themes/Flex --verbose # --verbose - to see the outputNow check that the new theme has been installed properly # pelican-site/themes (venv) pelican-themes -lv # output .../pelican-site/venv/lib/python3.8/site-packages/pelican/themes/simple .../pelican-site/venv/lib/python3.8/site-packages/pelican/themes/notmyidea .../pelican-site/venv/lib/python3.8/site-packages/pelican/themes/FlexCool, we've added new theme to our project. But we can't use it for our new layout yet. We need to tell Pelican which theme to use. Open pelicanconf.py setting file in your text editor and add new line. THEME = 'Flex'After this run the dev server (make devserver). The site theme should've changed.
All right we have a website that works on our local machine, let’s pair it with GitHub Pages. I will keep the process as simple as it can be in order to keep the feeling of control over the process. Firstly we need to make some changes to the pelicanconf.py file SITEURL = 'https://your-github-username.github.io' DOMAIN = SITEURL FEED_DOMAIN = SITEURL HTTPS = TrueNavigate to your GitHub account, create new repository and name it your-github-username.github.io (mine is ‘sammirabyan.github.io’), press the Create repository button.
After that you will be redirected to the default page for selecting options for an empty repository.
Great, we have sent our static files to our GitHub pages repository, you can navigate to this repository from your browser and notice one orange mark. GitHub by default runs Actions workflow to ensure everything is set up properly. After it's finished you can navigate to your-github-username.github.io and see your site running. Looks nice! Versioning your source codeNext what I recommend is pushing your source files to GitHub as well. It will save you a lot of time in case of a file loss on your local machine or in case you need to work with your site using another device. Create new GitHub repository, name it something like pelican_site_source_code or whatever the name you want. Choose private option to make this files invisible to others. Then we need to do the trick like we did with our github.io repository but with a little more effort. Again copy the upmost link and head to source/ directory # pelican-site/source git init git checkout -b main touch .gitiignore # then pause with command line and open your text editor # add this code to `.gitignore` file __pycache__/ *.py[cod] *$py.class *.so .Python env/ build/ develop-eggs/ dist/ downloads/ eggs/ .eggs/ lib/ lib64/ parts/ sdist/ var/ *.egg-info/ .installed.cfg *.egg *.manifest *.spec pip-log.txt pip-delete-this-directory.txt htmlcov/ .tox/ .coverage .coverage.* .cache nosetests.xml coverage.xml *,cover .DS_Store *.mo *.pot *.log docs/_build/ target/ pelican-plugins themes .venv/ output *.pid .vscode/ # after that switch to command line and proceed git add . git commit -m 'initial commit' git remote add origin **paste copied link** git push -U main originNow we have our source files safely stored in a remote repository. Pay attention that in this case you need to maintain (manually) the state of two repositories – one for the output and another for the source code. There are some tools to make life easier and less error-prone, I hope you'll easily find them yourself. Wrapping upWell, we've covered some major steps from an empty directory to having our website published on the internet. In this tutorial we've discovered how to use Pelican to: scaffold your website's code structure; generate HTML files from Markdown; create articles; create static pages; change layout with Pelican themes; publish generated static files on GitHub Pages; store your project's source code on GitHub.There is still a lot that remained uncovered by this article. The rest should be picked up on the go while solving problems and improving your new existing site. Thanks for reading! I hope it was an interesting one. See you next time! tags: python, pelican, github |

 The process of adding Contact page is the same, so you can do it on your own.
 Further customizations and tips you can find in this great multi-step tutorial by Ayush Kumar Shah.
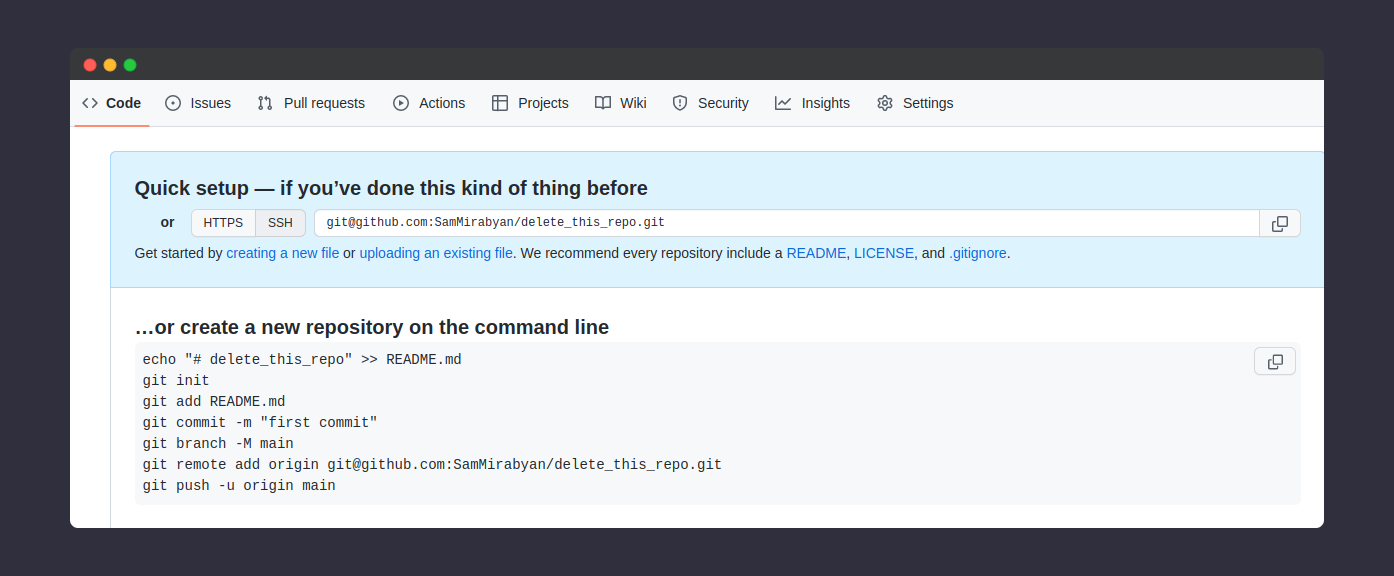 Copy the upmost link and navigate to the output/ directory.
Here you need to run some instructions:
Copy the upmost link and navigate to the output/ directory.
Here you need to run some instructions:【本文地址】